How to Read Data Posted Using Javascript
Read HTML Grade Data Using GET and Postal service Method in Node.js
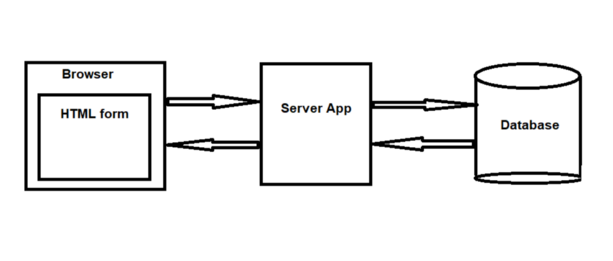
Hello world, welcome to the blog. In this blog we'll hash out how to create a server awarding using Node.js that will read data from HTML form and will perform basic operations like insert, read, update and delete on SQLite3 database using GET and Post requests. We'll also add security features by using modules similar Helmet and Express-rate-limit.
Yous can besides find the entire projection in my GitHub repository —
The bones outline of our project and the HTML course is shown below -

Prerequisites -
- Knowledge of — HTML, CSS, Node.js, and SQLite3
- Node.js and SQLite3 should be installed on your local machine.
So, at present we are ready to initiate our projection. let'due south dive in.
Step 1: First of all, open up the concluding and create one directory which will be dedicated for our project. Navigate into that directory and run npm init . So you will be asked to enter various details nearly your awarding, which will be stored as a json file named 'Package.json'. Then you have to run following commands —
npm install express --relieve to install the 'express' module,
npm install sqlite3 --salvage to install 'sqlite3' module, and
npm install body-parser --relieve to install 'body-parser' module
npm install helmet --save to install 'helmet' module.
npm install express-charge per unit-limit --save to install 'express-charge per unit-limit' module.
Note - helmet is a Node.js module that helps in securing 'limited' applications by setting various HTTP headers. It helps in mitigating cantankerous-site scripting attacks, misissued SSL certificates etc.
Express-charge per unit-limit module is a middleware for Express which is used to limit repeated requests to public APIs and/or endpoints such as password reset. By limiting the number of requests to the server, we can prevent the Denial-of-Service (DoS) attack . It is the type of attack in which the server is flooded with repeated requests making it unavailable to its intended users and ultimately shutting it down.
Step two: Now permit'due south offset writing HTML and CSS code. We will proceed our HTML and CSS files in a directory named 'public', which is itself present in our project directory. In the HTML file, we'll define the head section first.
          <!DOCTYPE html>
<html lang = "en">
<head>
            <meta charset = "UTF-8">
            <link rel = "stylesheet" href="fashion.css">
            <title> My Form </title>
</head>
And so we'll write the body department. The following code will enable user to add together a new employee to the database.
          <body>
            <header>
            <h1>Employee Database</h1>
            </header>
            <class action="/add" method="POST">
            <fieldset>
            <h3>Add new employee</h3>
            <label>Employee ID</label>
            <input type ="text" id = 'empID' name="id" required>
            <br><br>
            <label>Proper noun</label>
            <input type="text" id = "name" name="name" required>
            <br><br>
            <button type ="reset">Reset</button>
            <button type ="submit">Submit</push button>
            </fieldset>
            </grade>
The code below will enable user to view any employee based on their ID number.
          <form action="/view" method="POST">
            <fieldset>
            <h3>View an employee</h3>
            <label>Employee ID</label>
            <input type="text" id="empID" proper name="id" required>
            <br><br>
            <button type ="reset">Reset</button>
            <push button type ="submit">Submit</push>
            <br><br><br>
            </fieldset>
            </form>
The post-obit two code snippets are for updating and deleting employees from the database.
          <form action="/update" method="POST">
            <fieldset>
            <h3>Update an employee</h3>
            <label>Employee ID</label>
            <input type ="text" id = 'empID' name="id" required>
            <br><br>
            <label>New Name</label>
            <input type="text" id = "name" proper noun="proper name" required>
            <br><br>
            <button type ="reset">Reset</button>
            <push blazon ="submit">Submit</push>
            </fieldset>
            </class>          <form action="/delete" method="POST">
            <fieldset>
            <h3>Delete an employee</h3>
            <label>Employee ID</label>
            <input type ="text" id = 'empID' proper noun="id" required>
            <br><br>
            <button type ="reset">Reset</button>
            <button type ="submit">Submit</button>
            <br><br><br>
            </fieldset>
            </form>
At final nosotros'll include a footer which will tell the user how to shut the database connection.
                      <footer>
            <hr>
            <h4>Delight enter 'http://localhost:3000/close' to close the   database connection before closing this window</h4>
            </footer>
            </body>
</html>
Step 3: Now we'll write the CSS codes for styling our webpage.
Step four: Since, we have designed our forepart terminate, now we'll build our back-end server application in Node.js. Nosotros'll create a file called 'app.js' in our chief project directory and import all the necessary modules.
Notice that the execution mode is set to verbose to produce long stack traces.
In the higher up code, we have created an case of express, named 'app' and we have likewise created a database named 'employee' in the 'database' directory which is present in our current directory.
windowMs is the timeframe for which requests are checked/remembered.
max is the maximum number of connections during windowMs milliseconds earlier sending a 429 response.
bodyParser.urlencoded() returns middleware that only parses urlencoded bodies and only looks at requests where the Content-Blazon header matches the type choice.
express.static() is used to serve static files in 'express'.
So, we'll create a table named 'emp' in the database having two columns- 'id' and 'name' using the following lawmaking -
The above code will make sure that 'emp' table won't exist created again and again whenever we run the application.
Step 3: At present, it is the time to write the codes for listening to the Go and POST requests made by the browser.
When the user enters http://localhost:3000 in the browser's address bar, post-obit code will take care of this Go request and will ship the HTML course as a response.
INSERT

To insert a new employee into the 'emp' table, the user is required to fill this part of the grade.
And the following code will take care of this Mail request -
In the above code, the serialize() method puts the execution mode into serialized mode. It means that merely one statement can execute at a time. Other statements will wait in a queue until all the previous statements are executed.
READ
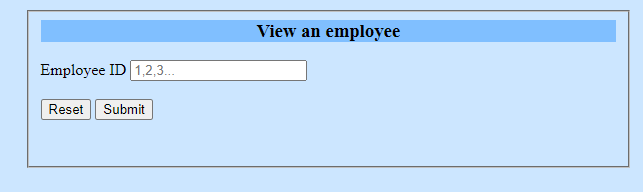
To view an employee from the 'emp' table, user is required to enter the Employee ID in this part of the form.
The post-obit code volition take intendance of this POST request.
In the above code, the each() method executes an SQL query with specified parameters and calls a callback for every row in the outcome prepare.
UPDATE

To update an existing employee, the user is required to enter the existing Employee ID and the New Name.
This POST asking will be handled by the following code -
DELETE
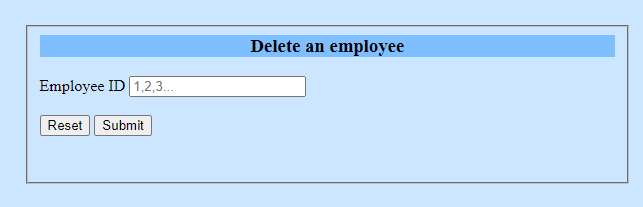
To delete an existing employee from the 'emp' tabular array, user is required to enter the Employee ID and this Postal service request will exist handled past the following code-
Pace 4: Now, we'll write code for closing the database connection.
The above code volition role when the user enters http://localhost:3000/close in the accost bar of the browser.
Step 5: Now, we need to brand our server application listen to all the requests fabricated past the browser, which will be achieved by the following command-
Step 6: Now that we have written all the codes for our server application, we'll save information technology and become back to terminal to run this using the command node app.js. The following message will be displayed in the console -
Server listening on port: 3000 And so, now our server is up and running. We volition open the browser and enter http://localhost:3000 to start doing the CRUD operations.
Pace 7: Then, open up the Network tab by clicking on Inspect Element. Click on localhost and you will observe some additional set up of headers in the response, which are prepare by the helmet module.
Summary
If you have completed above steps, then you have created a secured server application which tin can read data from HTML form and perform insert, view, update and delete operations.
References:
https://www.npmjs.com/parcel/limited
A consummate documentation for using express module.
https://www.npmjs.com/packet/sqlite3
A complete documentation for using sqlite3 module.
https://www.npmjs.com/package/body-parser
A complete documentation for using body-parser module.
https://www.npmjs.com/package/express-charge per unit-limit
A complete documentation for using limited-rate-limit module.
https://www.npmjs.com/package/helmet
A complete documentation for using helmet module.
Source: https://medium.com/swlh/read-html-form-data-using-get-and-post-method-in-node-js-8d2c7880adbf
0 Response to "How to Read Data Posted Using Javascript"
إرسال تعليق